If you are someone who
loves the look of rustic twig furniture but it is simply not in your budget to
purchase any of the beautiful handmade pieces on the market, you will be happy
to know that by following some basic DIY instructions, you can easily create
these pieces yourself. You can build chairs, tables, head boards, awnings, and
much more, turning your home into a cozy and welcoming space. Below is an
example of how to build a rustic chair, and the same initial steps can be used
with all rustic furniture pieces.

Step One: Supplies
You may already have many
of these supplies on hand, and if not, these low cost items can be purchased at
virtually any hardware store. You will need:
- 2 1/2 to 4 inch
galvanized framing nails
- Finishing nails that will
be used for the headrest, seat, and arm rest
- Measuring tape
- Rasp
- Small bow saw
- Hammer
- Garden shears/pruning
shears
- Drill
- Paintbrush
- Turpentine
- Linseed Oil

Step Two: Harvest Your
Twigs
One great benefit to
building your own twig furniture is that the bulk of your materials can be
found in nature. Willow twigs can be found along rivers, lakes, and streams. It
is important to note that pussy willow twigs are what you should be looking for,
as weeping willow twigs tend to be brittle, which can cause them to crack and
break easily. When choosing the twigs, the straighter the better, and you want
to make sure that they are free of gnarls. Pruning plants is the best way to
collect your twigs without causing damage to the root, and it is also a good
idea to collect extra twigs to leave room for errors.
Step 3: Build Your Chair
The first step is to create
the sides of the chair. The twigs that you chose for your side beams and chair
legs should be larger in size, and the front and back legs should line up
approximately 20 inches apart. You will then fasten your side beams across the
top and bottom legs. The top beam should be around 1 inch down from the top of
the front leg, and the bottom beam should be around 4 inches up from the bottom
of the legs. The side beams can be fastened with 2 1/2 inch nails, and you want
to make sure both sides are even with one another. You will then join the sides
of the chair together by placing the front beam on top of the top side beams,
and these beams can also be fastened in place with 2 1/2 inch nails. Simply
repeat this step to place the bottom beam, only place the beam on the top of
the bottom side beams.
Once your bottom half of
the chair is stable, you will add the headrest. The first step is to place your
headrest beam on top of the back legs, making sure that it extends the same
length on both sides. Next, approximately 8 inches from the top rear beam, use
your measuring tape to measure the exact distance between the back legs. Once
you have an accurate measurement, you will cut your stretcher beam to the
desired length. The stretcher beam should be fastened to the back legs with 4
1/2 inch nails. You will then place the back and front ends of the side braces
outside the front legs of the chair and underneath the top side beams. These
can be fastened with 2 1/2 inch nails.
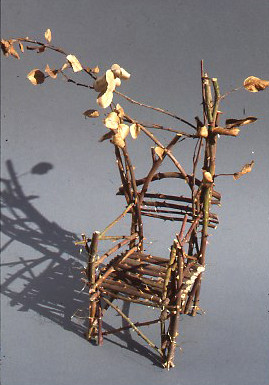
Placement of the seat is
next, and the first step is fastening the front seat beam to the top side beams
right behind the top front beam with 2 1/2 inch nails. Repeat this step for the
rear seat beam, only attach 5 inches from the front rear beam. The armrest is
the next step in the process, and this can be done with 5 to 6 shoots. You will
first want to manually curve the shoots by flexing them over your knee, and the
first shoot should be attached to the inside of the bottom front beam. Bring
the opposite end of the chute up and over to the outer side of the back leg,
and repeat this step with the remaining shoots.
The head rest, backing, and
preservation are the final steps, and the head rest hoop can be made in the
exact same fashion as the arm rests, and the ends of the shoots need to be
attached behind the rear seat beam. To attach the back of the seat, first rasp
each shoot on the root end. Insert the shoots through the center of the chair
back. The rasped end should rest on the top beam and the upper edge of the
shoot should rest behind the head rest. Once you have pushed the shoots into
place, they can be easily fastened with 1 inch finishing nails. The final step
in the process is preserving your chair with 1 part turpentine and two parts
linseed oil. Apply the finish with your paintbrush, and there you go! Your DIY
rustic twig chair is complete.
Save Money By Doing it
Yourself
In today's world, it is
definitely important to save money wherever you can, and home furnishings can
be quite costly. By following a few easy steps, you can create your very own
rustic twig furniture that is both affordable and stylish.
No comments:
Post a Comment